
You can use Tracker’s CSV import/export feature to duplicate a project. Just export its stories and epics so they can be imported into a new project, or used as a template for importing into a project at a later time.
1. Export all stories/epics from the project you wish to duplicate
To duplicate a project, start by exporting all its stories and epics.
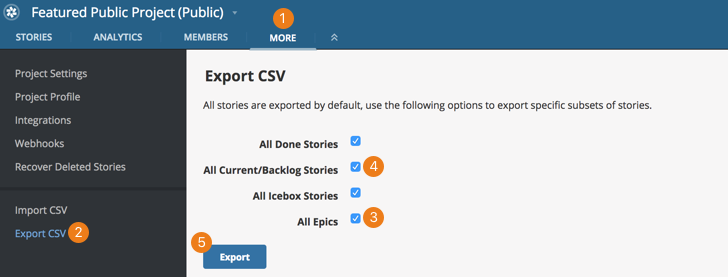
- Click the MORE tab in the top nav of your Project Stories view.
- Choose Export CSV from the side navigation menu.
- All stories will be exported by default; however, make sure to select All Epics if you’d like those exported as well.
- You can also select subsets of stories, including Done, Current/Backlog, or Icebox stories.
- Click Export.
2. Groom your CSV file
After your file has been exported, you’ll want to go through it to ensure it imports into the new project smoothly.
- Open your CSV file in a spreadsheet application such as Excel or LibreOffice.
- You can only import 3000 stories at a time into Tracker, so you’ll want to break up the file if it has more than 3000 stories in it. Please be sure to include the header row in each additional CSV file for import (i.e., ID,Title,Labels,Type,Estimate,Current State,Created at,Accepted at, etc).
- Remove the ID column from each file (story IDs are unique and would only be retained if you are updating existing stories via CSV import).
- If the originating project had any externally linked integrations (e.g., Zendesk, Bugzilla, etc.), please make sure they are also identically configured in the destination project. Otherwise, you’ll need to remove the Integration columns from each file.
- Make sure your files are saved in UTF-8 as well as CSV format.
You can now either save your file as a “template” to be imported into a new project at a later time, or proceed to Steps 3 and 4 to complete the process.
3. Create a new project
If you haven’t already, create a project in Pivotal Tracker, then check its Project Settings page to make sure the point scale is the same as you’ve been using to estimate within the original project. Then, invite your team members to that project so they’ll be able to use the stories you’re about to import.
Additional considerations
- As long as you invite the original project members to the new project prior to importing, all original story requesters will be retained. Otherwise, the importer will become the requester of any stories in which Tracker is unable to map to an existing project member.
- Email notifications are not generated from the import process.
- If you estimated bugs/chores in the originating project, you’ll need to enable the Bugs and Chores May Be Given Points setting from your Project Settings page; otherwise you’ll receive an error when importing a file that contains pointed bugs/chores.
- If the originating project had any externally linked integrations (e.g., Zendesk, Bugzilla, etc.), please make sure they are also identically configured in the destination project. Additionally, the integration name(s) in your file needs to match the integration name(s) in the project.
4. Import your CSV file into your new project
Now that you’ve groomed your CSV file and created the destination project, you can import your file into the new project by following these steps:
- After loading the destination project in Tracker, click MORE in the top nav of your Project Stories view.
- Select Import CSV from the sidebar.
- Click Choose File and select the appropriate file.
- Repeat Steps 1-3 for any additional files.
For more on importing, see CSV import/export.
If for any reason you encounter errors while importing and are unable to resolve them yourself, feel free to email our support team at support@pivotaltracker.com (preferably with a copy of the problematic CSV file).