

You can integrate your project with your hosted or local JIRA instances that are externally accessible. This integration works with JIRA versions 5.0 and above.
Webhook configuration (New!)
You can now create a Webhook Payload URL in Tracker and paste this URL in Jira to get comment updates from Jira. A webhook is a user-defined callback over HTTP. You can use Jira webhooks to notify Tracker when certain events occur in Jira. For example, you might want to see Jira comments added to the imported Jira Stories in Tracker. Using a webhook to do this means that Tracker doesn’t have to periodically poll Jira (via the REST APIs) to determine whether comments have been posted to any Jira issues that have been imported into Tracker as stories.
Important Information for existing Jira Integrations
During the migration to the new configuration, any existing Tracker - Jira integrations will automatically have a system-generated Webhook Payload URL added by Tracker.
You will need to follow the additional step below to copy the payload URL and add it under your JIRA admin account to complete the Tracker - Jira webhook configuration.
How to create a JIRA integration
Go to the INTEGRATIONS tab in your project view, click Add an integration, and select JIRA.
Integration configuration part 1
Project
This is the integration’s associated project.
Name
The is the name of the integration. You’ll see this when you view a list of integrations.
API email / username
This is the email address registered with JIRA for a user who has read/write access to your JIRA instance, via the JIRA API. We recommend creating a user specifically for this integration.
For some older versions of JIRA On-Premise, a username and password are still required. If the integration fails, you may be using an older JIRA version that still requires the username for authentication.
API token / password
Enter the API token of the JIRA user. If you need to generate one, please see JIRA - API token. If you are using an older version of JIRA On-Premise, you may need to use the JIRA user’s password instead.
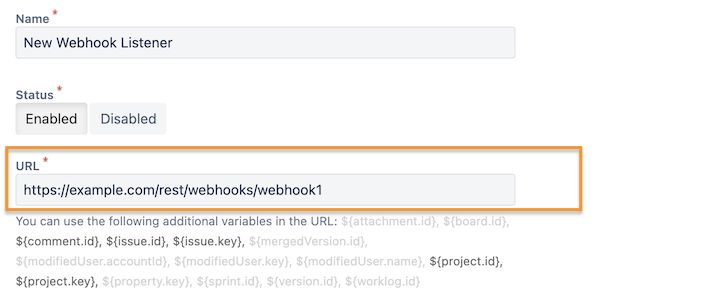
Base URL
This is the URL of your JIRA instance (e.g., http://yourcompany.atlassian.net).
Filter ID
For this integration, Tracker uses a saved JIRA filter to choose which issues to show in the JIRA Import panel. You can save a search in JIRA as a filter, and filters appear on your JIRA dashboard. Grab the ID out of the filter URL, which you can see in your browser by hovering over the filter link. Look for requestId=10000 in the URL.
This is the URL of your JIRA instance (e.g., https://yourcompany.atlassian.net).
Update comments
If enabled, comments created in Tracker will be added to the linked JIRA issue.
Update state
Whether or not to add a state change comment about a Tracker story to its associated JIRA issue.
Update JIRA to allow Tracker integrations
-
Create a new user with username “tracker_integration.”
-
Create a new group called “tracker_integration” with product access and add a “tracker_integration” user.
-
Create a copy of the Classic default workflow in JIRA, with additional conditions on each transition to allow users in the designated Tracker integration group to complete that transition. To do this, edit each of the following Transitions: Open > Start Progress, In Progress > Stop Progress, Resolved > Reopen Issue, Reopened > Start Progress, Closed > Reopen Issue, as follows:
- Click the Transition.
- Click Add Condition.
- Select User Is In Group and click Add.
- Select the tracker_integration group and click Add.
- Select Any of the following conditions in the Add condition header.
-
On the Project Admin page, change the Workflow Scheme to the new scheme.
Integration configuration part 2
If you are using Tracker’s Jira integration for the first time in your Jira account as well as in your Tracker project:
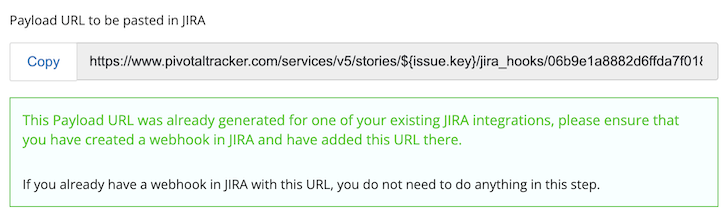
- Once you complete the steps above and click Save, you will then be able to see an automatically generated Payload URL available to copy to the clipboard. You will need to add it to your JIRA - Webhook creation settings as described below.
If you are using Tracker’s Jira integration for the first time in your Tracker project only:
- Once you complete the steps above and click Save, you will be able to see an automatically generated Payload URL available to copy to the clipboard.
Update JIRA to allow the Tracker Webhook Payload URL configuration
A user with admin rights in JIRA can add the webhook in JIRA.
- Go to JIRA > Settings icon (top right) > System > Webhooks > Create a Webhook (button).
- Paste the Payload URL in the Jira UI as shown below.
Please enable only the following items in Jira. While the comment items will be the only ones used for now, if and when we support any additional items in the future, enabling these all now will mean it won’t be necessary to go back and enable them later.

How the integration works
Stories created from JIRA issues will be linked to the corresponding issue, and you will see a link to the JIRA issue on the story. Any comments added to the story will appear as comments in the JIRA issue. Also, as the Tracker story is started, finished, and accepted, the state of the linked JIRA issue will update accordingly (unless Update comments or Update state is unchecked on the configuration page). For instance, when the state of the Tracker story changes to Started, the associated JIRA issue will change to In-Progress. Likewise, Tracker’s Finished state maps to Resolved in JIRA; Accepted maps to Closed; and finally, if the story is Rejected, the JIRA issue should change to Re-Opened. So only the Tracker states of Started, Finished, Accepted, and Rejected will cause the JIRA issue to change state (the Delivered state causes no changes).
Currently, only the default JIRA issue workflow is supported. If you’ve configured your JIRA instance with a nonstandard workflow, issue state updates from Tracker may not work. Also, you may need to enable API access for your JIRA instance in Administration/General Configuration (select the Accept Remote API Calls option).