
For more details about the intent and history behind The Standup Updates Utility please see the Tracker blog article, “Introducing the Standup Updates Utility for Pivotal Tracker”.
Configuring a Project as a Standup Project
To get started with the Standup Updates Utility, you’ll need to follow a few simple configuration steps:
1) Please contact the Pivotal Tracker support team to access the Beta version of the Standup Update utility for your account. Once this utility is enabled for your account, you’ll be able to proceed with the steps below.
2) Create a new project specifically for managing standup updates, navigate to the “Manage Standup Config Setting” section. Here, you’ll find a checkbox labeled “Configure as Standup Project”. Make sure to tick this checkbox to activate the feature for the selected project.
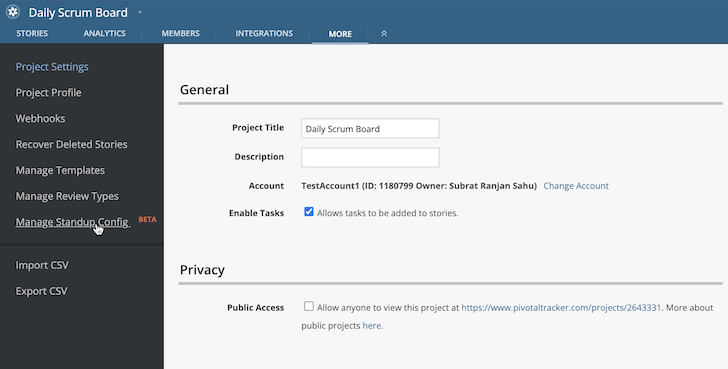
Image: Contact support to enable ‘Manage Standup Config Beta’.
3) Set up a Standup Start Time, which is the time at which you prefer to conduct the standup ceremonies. This can be adjusted to match your team’s preferred time for conducting standup ceremonies. If you have Slack integration enabled (see Slack integration for standup), this is the time when a notification will be sent on the Pivotal Tracker Slack app.
4) Next, specify the Standup Report Delivery Time. This time should be later than the standup start time and it determines when the standup update report will be delivered to team members. (More about it in Delivering Comprehensive Reports for Better Insights). It’s crucial to select a time that allows participants to review the updates before their daily standup meetings or discussions. Please note that times are based on your project’s timezone.
5) Under the “Tracked Projects” section, select the projects that you want to include in the standup updates. Ensure that these projects are part of the same account as the standup project you’re configuring. This feature enables you to consolidate updates from multiple projects into a single standup report.
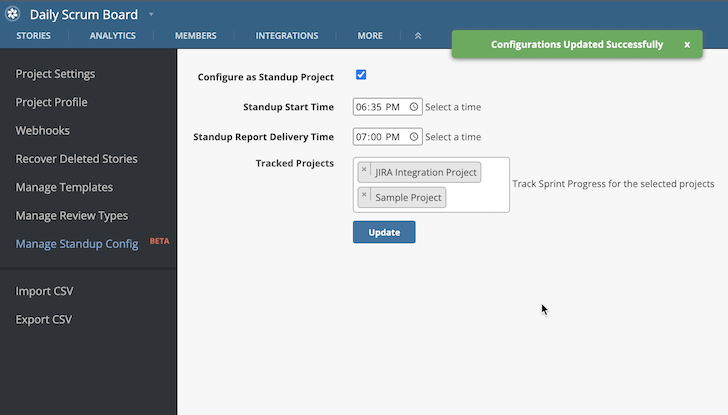
Image: Add Standup Configuration Details.
Posting Standups
Once the Standup Updates utility is configured, the system will automatically create a new story in the icebox panel each day at the specified Standup Start Time. The story will be named Standup-<Date>, where <Date> represents the current date. These stories are auto-archived from the Icebox panel and moved to the Done panel after every 2 sprints.
Team members can then update their status by adding comments to this standup story. It’s essential to follow a specific format for these updates to maintain consistency and clarity. The recommended format includes the following sections:
- What did I do yesterday? Provide a brief summary of the planned tasks or additional accomplishments from the previous day.
- What’s my plan for today? Outline the tasks or objectives planned for the current day.
- How are you doing today? Share a general sentiment or any relevant information regarding your current well-being or state of mind.
Additionally, team members can report any issues or blockers they’re facing by adding them as blockers within the standup story. Mentioning blockers explicitly allows the team to bring focus and address these impediments promptly and collaboratively.
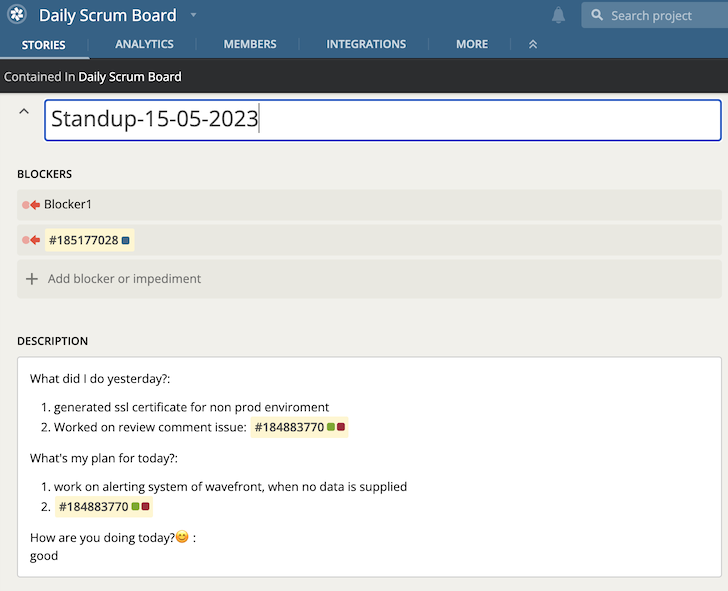
Image: Standup Update Format.
Delivering Comprehensive Reports for Better Insights
In addition to the standup updates themselves, the Standup Updates utility in Pivotal Tracker includes a powerful reporting capability. At the specified Standup Report Delivery Time, a detailed report will be generated and distributed to all members within the Standup Project. This report is generated in an Excel file, providing a structured overview of the team’s progress and individual contributions. Let’s explore the key components of this report.
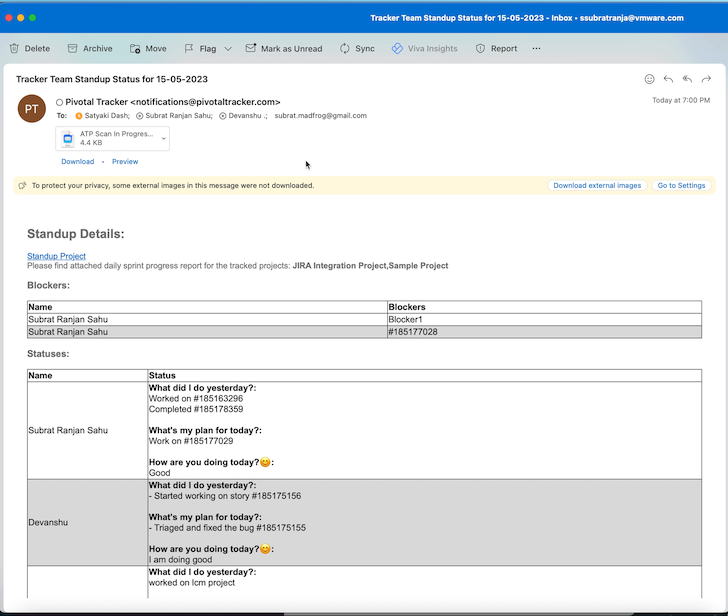
Image: Standup report email.
1) Individual Story Count: The report includes a separate sheet for each project configured for the Standup Updates utility. Within each sheet, team members’ story counts are displayed. This information is categorized based on two roles: “Owner” and “Reviewer.” Each member’s story count is provided, along with direct links to the corresponding stories. This allows for easy access to the specific tasks or features being worked on by each team member.
2) Team Progress by Status: To gain insights into the team’s overall progress, the report presents information on each member’s story counts based on different story states. These states could include “Accepted,” “Started,” “Finished,” and more, depending on your project’s specific workflow. The report highlights how many stories are associated with each state for every team member, offering a clear snapshot of their individual progress.
This data is presented both in a tabular format and through graphical charts, providing visual representations for quick and easy comprehension.
The tabular format offers a comprehensive overview of the team’s progress, while the graphical charts provide a visual representation of the data. These charts are designed to make trends and patterns easily identifiable, enabling stakeholders to quickly assess progress and identify any potential bottlenecks or areas of improvement.
By delivering the standup updates as an Excel report, the Standup Updates utility in Pivotal Tracker goes beyond simple text-based updates. It empowers teams and stakeholders with rich, actionable data that can drive decision-making and foster effective collaboration. With these detailed reports, team members can gain a holistic understanding of the project’s status, identify dependencies, and track progress against goals. Managers and project leads can also use this information to allocate resources effectively, identify potential issues early on, and ensure that the team is on track to meet project objectives.
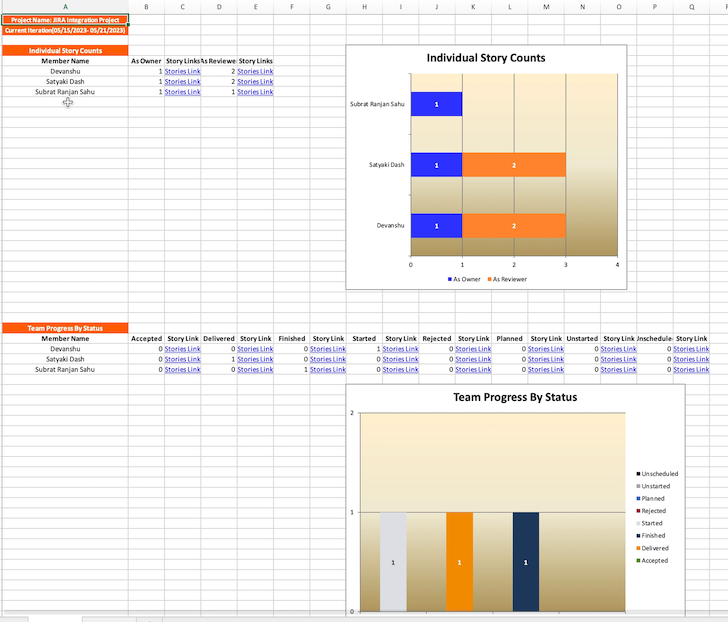
Image: Detailed Standup Excel Report.
Wait, we’re not done! Read on to find out how you can integrate Slack with your standup project to provide updates directly from Slack via the Tracker Slack integration!
Boosting Standup Efficiency with Slack
The Standup Updates utility in Pivotal Tracker also works with Tracker’s Slack integration! By integrating your Pivotal Tracker account with Slack, you can leverage the convenience of a Slack slash command to provide standup updates. Let’s dive into the simple steps to set up and use this integration.
1) Integrate Slack with Pivotal Tracker: Begin by integrating Slack with your Pivotal Tracker account. You can refer to the Pivotal Tracker Slack Integration Help page for detailed instructions on how to set up this integration. Follow the provided guidelines to seamlessly connect both platforms.
2) Slash Command for Standup Update: Once the integration is in place, you’ll have access to the Standup Update feature as a Slack slash command. Simply type /tracker standup_update in the Slack app integrated with Pivotal Tracker. This command will open a modal
window, enabling you to provide your standup update conveniently within Slack.
3) Select a standup project: In the modal window, you’ll be prompted to select the project for which you want to provide the standup update. If you have configured multiple projects for standup updates, they will all be available in the drop-down menu for selection.
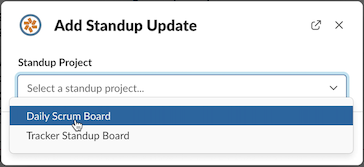
Image: Select the standup project from the dropdown in Tracker Slack app.
4) Submit the details: After selecting the project, a dialog box will appear with four fields:
- “What did I do yesterday”,
- “What’s my plan for today”,
- “How are you doing today” and
- “Any Blockers” (optional). List any blockers as you would in a Tracker story (story IDs, etc.), separated by commas.
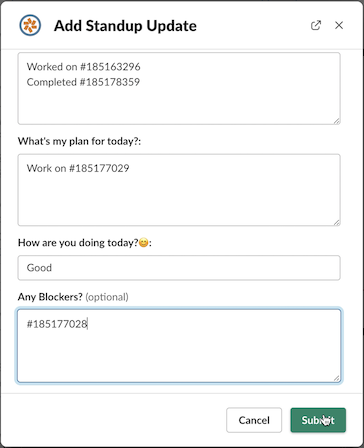
Image: Update the standup details in the window.
5) Once you have entered all the data, click Submit! Slack will respond with a success message and provide a link to the story created in the Standup project for the current date. This link serves as a quick access point to view and edit your standup update. By clicking on the link, you will be redirected to the standup story containing your status update.
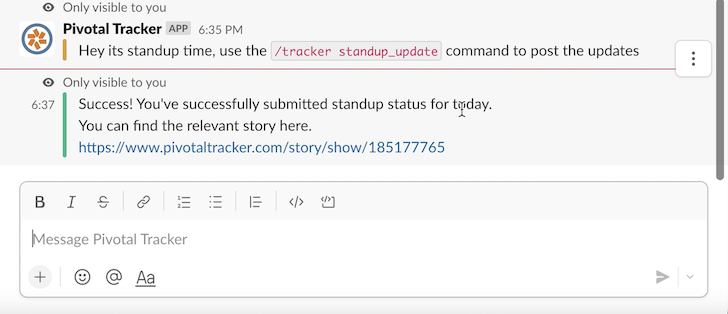
Image: Success notification with story link after posting the standup update.
An added advantage of using Slack for standup updates is the automatic population of the previous working day’s status when you run the slash command and select the Standup project. This streamlines the update process and saves you time.
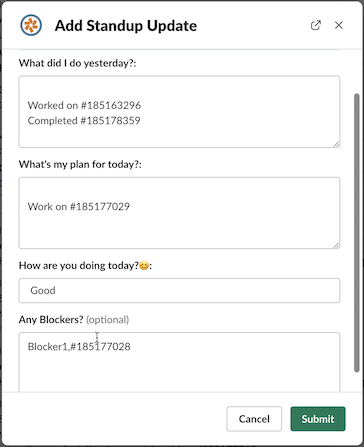
Image: Auto-Population of previous day data in Slack.
Kindly be aware that if you are posting via Slack for the first time, the previous day’s status will not be auto-populated. Additionally, discrepancies in the auto-populated data may occur if previous standup updates were not in the recommended format.
To ensure consistent and accurate updates, please use the recommended formatting and consistently use Slack for posting standup updates.