Nathan Swain

Migrating to Pivotal Tracker from a Third-Party Tool

Productivity

Welcome to everyone who recently started using Tracker! If you were using a different project management tool previously, you probably have tickets or stories you’d like to get into your Tracker projects. One convenient way to migrate them over to Tracker is to place them in a CSV file that’s compatible with Tracker’s import tool. Below, we’ve outlined five easy steps to accomplish that.

Step 1. Create a project.

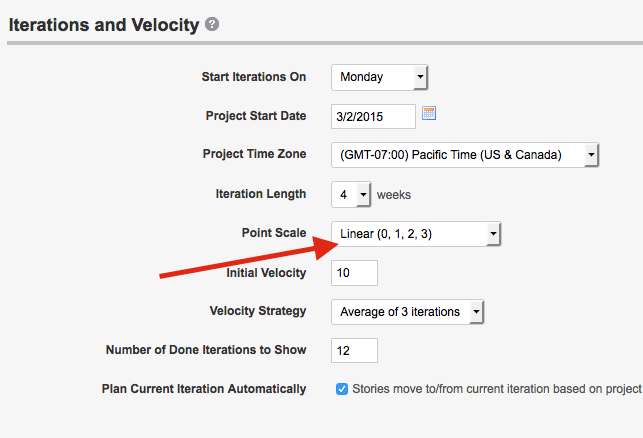
If you haven’t already, first create a project in Pivotal Tracker, then check its Project Settings page (click the project menu gear icon located near the upper left, then Edit Settings from the dropdown) to make sure the point scale is the same as you’ve been using to estimate with in your current tool. Then, invite your team members to that project so they’ll be able to use the stories you’re about to import.

Setting iterations and velocity in Pivotal Tracker

Step 2. Export your stories.

Export your stories from your existing tool (preferably in CSV format). Afterwards, it’s best to open up the exported file in a spreadsheet application such as MS Excel or LibreOffice for easy manipulation of the content.

Step 3. Build your CSV file.

The first row in the exported CSV file should be renamed to match the column headers Tracker is expecting. Here’s a listing of the most commonly used fields for importing into Tracker, along with their definitions and possible values/restrictions.

Field Content Possible values or restrictions
Title The title of the story
  • 5,000-character limit
  • Required field
Labels Tags that you can associate to your stories Separate multiple labels by comma.
Type The type of story Feature, bug, chore, epic, release
Estimate The numerical point value you wish to assign to the story
  • Values must match the selected Point Scale for your project.
  • Epic and release types may not contain estimates.
  • Bug and chore types may contain estimates if the Bugs and Chores May Be Given Points setting has been enabled in the destination project’s settings.
Current State The state the story currently resides in Unscheduled, unstarted, started, finished, delivered, accepted, rejected
Created at The date the story was created (e.g., “Nov 22, 2014” or “11/22/2014”)
  • If left blank, the created date will default to today’s date.
  • Future dates are not allowed.
Accepted at If a story is given a Current State of accepted, you can specify the date the story was originally accepted, (e.g, “Jan 15, 2015” or “01/15/2015”)
  • If left blank, the "accepted at" date will default to today’s date.
  • Do not assign an "accepted at" date for any other state other than accepted.
  • Future dates are not allowed.
Requested By The name of the user who requested/created the story
  • If left blank, the requester will default to be the user who performs the import within Tracker.
  • The names in the file would also need to match the names in their Tracker Profile exactly (i.e., if the Tracker profile contains "David Smith" and the CSV file contains "Dave Smith," Tracker would treat Dave Smith as an uninvited user).
Description The content that will be used to describe the story 20,000-character limit
Owned By The name(s) of the user(s) who own the story
  • You can assign up to three owners, but each must be comma separated.
  • Again, names in your CSV file must match the user's name in Tracker exactly.
Comment Comments related to your story
  • 20,000-character limit
  • You can add as many comments as you like, but each must be separated into its own column.
  • You can specify an author and date by surrounding the member name/date in parentheses, following a space after the comment text (see screenshot).
You can specify an author and date by surrounding the member name/date in parentheses, following a space after the comment text
Task To-do items related to your story.
  • 1,000-character limit
  • You can add as many tasks as you like, but each must be separated into its own column.
  • Each Task column must be paired with a Task Status column.
Task Status The status of your task
  • Completed, not completed
Deadline A deadline date that can be added to a story of type release
  • Only stories of type release may be assigned a deadline.
  • Future dates are allowed.

Here’s an example of what your CSV file might look like:

An example CSV file

Step 4. Check your file for conflicts.

After you’ve built your CSV file with the fields Tracker is expecting, you’ll need to groom the file to prevent any possible conflicts. The following list covers the most important tips to ensure there will be no issues upon attempting the import.

  • File limit: You can only import 500 stories at a time into Tracker, so you’ll want to break up the file if it has more than 500 stories in it. Please be sure the first row in each file is the header row (containing the column headers/fields Tracker’s expecting).
  • Story order/priority: For stories with any state other than accepted, Tracker will order them in their respective panels to match their order in the file, so be sure to have them listed in priority order from highest to lowest.
  • Attachments: Attachments from your old stories will have to be uploaded manually to each story, as they cannot be imported via CSV, unfortunately.
  • Estimates: For the Estimate field, a value of “-1” indicates an unestimated story. However, if an estimate of “-1” is assigned, the state must be compatible (i.e., a feature story can’t be in the accepted state without a point estimate).
  • Estimates for bugs/chores: If you estimated bugs/chores in your previous tool, and also want them estimated in Tracker, you’ll need to enable the Bugs and Chores May Be Given Points setting from your Project Settings page (otherwise you’ll receive an error when importing a file that contains pointed bugs/chores).
  • Story IDs: Tracker can’t reuse your existing ticket/story IDs from your current tool, so don’t include an ID column/field in your import file. If you want to keep and reference them, you could use the comment field to contain the ID or a URL to the old stories.
  • Formatting: Please be sure that your file is saved in UTF-8 as well as comma-delimited (CSV) format.
  • Additional data: Your previous tool may contain additional data fields/columns that are not compatible with Tracker’s importable fields. If you wish to retain these points of data, you might consider adding them in the Description, Tasks, or Comments fields in your CSV import file.

Step 5. Import your CSV file into Tracker.

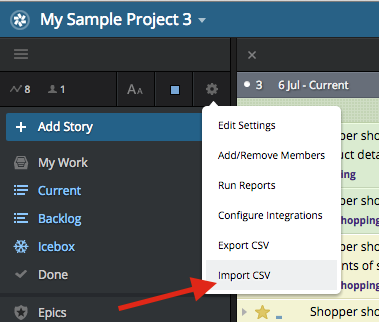
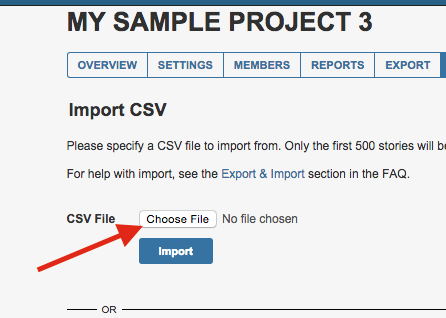
After you’ve created your CSV file and formatted it to be compatible with Tracker’s CSV Import tool, you can import the file by following the steps below:

  1. After loading the destination project in Tracker, click the project menu gear icon located near the upper left.
  2. Select Import CSV from the drop-down menu.
  3. Click the Choose File button and select the appropriate file.

The Import CSV option in Pivotal Tracker

Choosing a CSV file to import

For more on importing, check out this page.

If for any reason you encounter errors while importing and are unable to resolve them yourself, feel free to email our support team (preferably with a copy of the problematic CSV file) so we can assist you in troubleshooting any issues.

Though this post focuses on CSV as a way to get data from other tools into Tracker, you might find using our API is preferable. It’s even worth doing an internet search on the name of your tool and Pivotal Tracker, to see if someone has already created a migration tool/script, and made their tool available via Github, for example.

Finally, instead of migrating your data over, you might be looking for an integration instead. You might find your current tool listed among our integrations. Some other tool vendors have created their own integrations with Tracker as well.

We greatly appreciate that you’ve chosen Tracker for your project management needs and hope that this guide has assisted you in transitioning!

Happy Tracking!

—The Tracker Team

Category:

Tags: